Best Practice Topology for FortiGate SSL VPN
SSL-based VPN are notorious for their broad attack surface. FortiGates offer IPSec & ZTNA solutions for remote-access which have a significantly reduced attack surface and are recommended over SSL VPN implementations. That said, SSL VPN is easy to configure, and works well. Many Fortinet customers rely on SSL VPN to connect their remote users to their applications.
Securing the SSL VPN is critical. There are a number of mechanisms available to secure SSL VPN: local-in policies (CLI-only), source-address filters within SSL VPN settings (must also be set for each authentication mapping), configuring SSL VPN on a loopback interface (allows IPS sensor to inspection inbound traffic to loopback, but lacks support for inbound SSL inspection, etc… Also, in FortiOS 7.4, virtual-patching applies to local-in traffic, but only for signatures that specifically apply to FortiOS – you cannot yet customize the virtual-patching for local-in traffic, and you can’t create custom signatures.
The method I’ve found works best is implementing SSL VPN in a dedicated VDOM. This method allows you to apply firewall policies in any manner you see fit to traffic destined to SSL VPN. The primary reason I recommend operating SSL VPN in a dedicated VDOM is SSL inspection. This approach allows you to perform SSL inspection on all traffic inbound to SSL VPN. When coupled with IPS & WAF profiles, you’re firewall is better protected against malfeasance and bad actors.
The walkthrough below will guide you through the configuration process involved with migrating to a dedicated VDOM, or configuring SSL VPN for the first time.
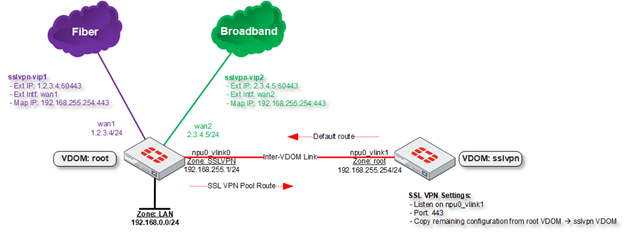
Topology
- Enable multi-vdom mode
- Create VDOM: “sslvpn”
- If available, assign npu0_vlink1 to sslvpn VDOM.
- If FortiGate lacks npu_vlink interface, create an inter-vdom link under Network –> Interfaces
- Assign IPs to npu0_vlink0 & npu0_vlink1
- Reference topology diagram
- Within root VDOM:
- Create system zone “sslvpn”, and select npu0_vlink0 as member.
- Create VIP(s) mapping to the npu0_vlink1 IP address.
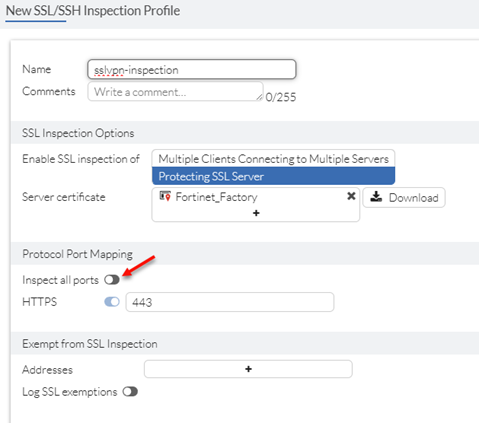
- Create SSL inspection profile (use the same certificate used within original SSL VPN portal configuration):
- Enable inspection of all ports.
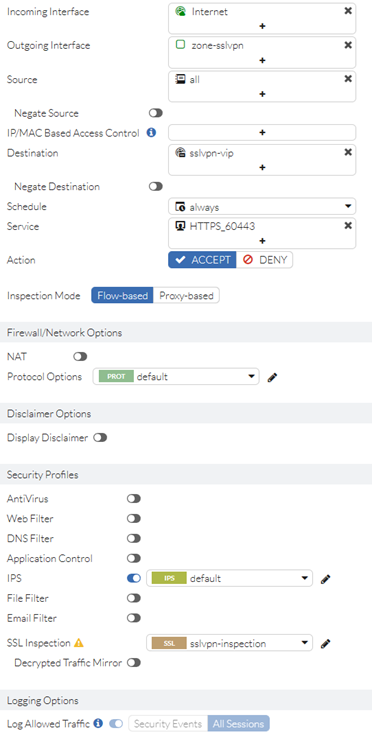
- Create policy permitting traffic from the outside/Internet to the “sslvpn” zone.
- Select sslvpn VIP(s) as destination object.
- Select sslvpn-inspection SSL Inspection profile.
- Select sslvpn-ips profile.
- Create static route for SSL-VPN IP Pool. Set device to npu0_vlink0 & gateway to the IP assigned to npu0_vlink1
- Create policies in root VDOM to accept traffic from sslvpn VDOM.
- Note: granualar access controls should exist in the sslvpn VDOM. To minimize complexity, policies accepting traffic in root VDOM from sslvpn may be permissive in nature.
- Within sslvpn VDOM
- Create system zone “root” and select npu0_vlink1 as member.
- Create static default route. Set device to npu0_vlink1 & gateways to the IP assigned to npu0_vlink0
- Migrate applicable SSL-VPN related configuration from root VDOM to sslvpn VDOM.
- RADIUS/LDAP servers
- Will require firewall policies in root VDOM to permit RADIUS/LDAP
- Note: source IP of RADIUS/LDAP requests will change to the IP assigned to npu-_vlink1
- Local users & groups
- Including FortiTokens
- SSL-VPN related security profiles
- SSL-VPN related policies
- Update destination zone to “root”
- Destination address must be specified. If “all” is used, SSL-VPN will full-tunnel traffic.
- SSL-VPN settings, authentication mappings & portals.
- Ensure SSL-VPN is listening on npu0_vlink1
- RADIUS/LDAP servers